From many great inputs from various sources on Sparkfun.com, allaboutcircuits.com and comments on this blog, I've come up with some improvements to the control circuitry. Those improvements are...
- PWM control of the driving MOSFET instead of a filtered linear voltage control
- An H-bridge controller to allow for heating as well as cooling via digital control
- Reducing outputs used by the micro-controller to free them up for anything else, or to use a smaller micro-controller
The first thing I noticed when runnning the previous circuits shown in Part 3 was that the IRF510 MOSFET was running very hot when it was not being driven at the saturation voltage. This is because MOSFETs are most efficient when run at full on. In the circuit in part 3, R8, R9 and C4 were filtering the PWM from the micro-controller and driving the MOSFET at a linear voltage. The MOSFET really needed to be run at either a full-on or full-off mode, i.e. true PWM. To accomplish this, get rid of R8, R9 and C4 and drive the MOSFET with a low-impedance circuit.

Next, I wanted to add the ability to heat as well as cool. To do this with a peltier device, all you need to do it change the polarity (reverse the current) to the peltier. This is commonly done to control motors to make them go in forward and reverse. I looked around for a cheap and good motor controller and found a great one at pololu.com called the MC33887 Motor Driver Carrier. You can also get it here at Sparkfun.com. This motor driver can handle up to 5A, so it can only be comfortably used in the soda-can cooling prototype. In the future I will be identifying a motor controller that can be used to cool a fermentation carboy.
Also, this motor controller has a useful function which allows monitoring of the current flowing through the controller. This can be used as a feedback control, however, for my purposes, I will be using this only as a current monitor.
To test the H-bridge along with peltier device, I hooked up the following simple circuit. For the RAW(~12V) supply, I used the +12V output from an old computer power supply. I also used the regulated 5V from to drive the micro-controller. Note: the download circuit is not shown, also ENAB is tied to 5V and D1 is tied to ground. The potentiometer was a 100K pot.

Here is the program code to run the above simple circuit.
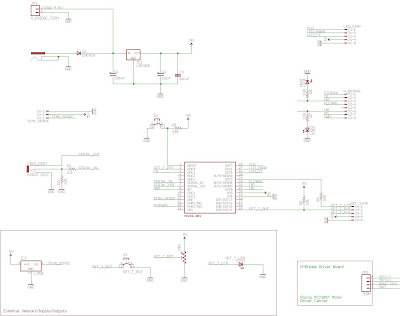
The circuit below shows how I will be implementing all these changes. I'm still using the same LED display board that I developed in Part 3. I am still developing the program code to run the circuit below, but it should be pretty straight forward and will involve some additional items added to the above program code to control the LED driver display, perform loop feedback control and get inputs from the temperature setting function.
In the next post, I will have the program code ready as well as the prototype of the soda can cooler completed. From there, I will do some actual cooling/heating and record some data to show it's performance.
Just to reiterate, these circuits have been developed for a small prototype of a soda can cooler/heater. I hope to scale everything up and fabricate a temperature controlled chamber for beer fermentation carboys. In these later discussions, I will post some things I've come across to drive multiple peltier devices efficiently.

Hi villacherman, I'm interested in this work because I'm making some similar, can you say me the new changes that you will use...thanks. superhhherrera@gmail.com
ReplyDeleteIt appears that your controller would have many uses such as Aquariums, brewing, plant propagation, ect. I believe it would work well for my purposes too. I wish to maintain an air temp of 72F (+- 1 degree). I've tried to built circuits before, but I only succeed in making smoke.
ReplyDeleteI wonder if you would sell a complete unit?
It think this circuit could make money for you. Are you familiar with Zero at Zero Fossil Fuel? He is selling a PWM to the HHO crowd for about $250. He and his wife build hundreds of them.
Bob-
ReplyDeleteI've thought about selling these units. The other option is to provide all the schematics and allow someone to build one themselves.
What volume of air are you ccontrolling the temperature of?
Very interested in your project! I'd like to use TEC to cool a conical fermenter (although I'll just try to make up for insulation loss and heat of conversion.)
ReplyDeletebro, can you plz post the circuit picture in bigger size?
ReplyDeletei really need your help =.=
thanks
Hi Villacherman,
ReplyDeleteI'm so glad I came across your blog. I'm doing a similar project but using an LCD and this blog is going to prove as a valuable resource! Thanks for sharing your knowledge.